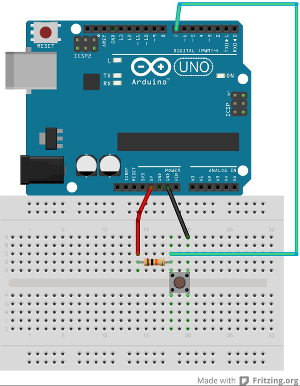
We will introduce control from our Arduino by adding a tactile button to clear the screen.
Circuit
Exercise 1
Using a breadboard, Arduino, tactile button and 10k resistor, set up a circuit to read in the state of the button on Digital Pin 7.

Arduino Code
Exercise 2
Write and upload an Arduino sketch that reads in the state of the button on Digital Pin 7 and prints it on the Serial Monitor. Check that a 1 is printed when the button is not pressed, and a 0 is shown when it is pressed.
Using Internal Pull Up Resistors
The resistor in the button circuit is a called a pull up resistor. This is because if the switch is open, the signal on the pin on the Arduino reading in the state of the switch is pulled up to 5V. If this pull up resistor hooked up to 5V wasn’t there and the switch was open, the pin would be reading in random values. We wouldn’t know if the pin is reading in 0 because it is actually connected to ground or if it’s just a random number.
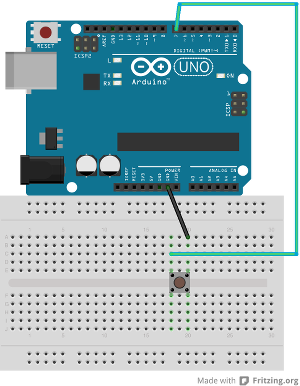
The Arduino has resistors in the microcontoller that can be used instead of external resistors. We activate these resistors in code and then have a simpler circuit with fewer components.
Exercise 3
Build the below circuit, removing the external pull up resistor from your button circuit.

Exercise 4
To activate the internal pull up resistor, we the second argument in the pinMode() function in our Arduino code.
pinMode( 7, INPUT_PULLUP ); // this sets up our pin to be an input
Confirm that your button still works as before.
Processing Code
When we use Serial.print() in our Arduino code, we are sending information over the Arduino’s serial port. When we open the Serial Monitor in the Arduino IDE, we are reading that data from the Arduino through the computer’s serial port. Processing can access that same serial port and read that data into Processing.
** It is important to note that only one device or application can read from a serial port at a time. This means if Serial Monitor is open and reading in data, then a Processing sketch also reading in that same data can’t be running. Furthermore, new sketches are loaded onto the Arduino using the serial port, so if you have a Processing sketch running that is accessing the serial port, then you can’t upload a new Arduino sketch. **
Exercise 5
Processing has a built-in library to handle reading from and writing to a serial port. Import it by adding
import processing.serial.*;
to the top of your Processing sketch.
Also declare a new Serial object as a global variable.
Serial myPort; // our serial port
Inside of setup() we instantiate our object. First we print a list of all serial ports available.
println(Serial.list()); // print list of all ports
Run the sketch and find the number in the list that corresponds to the serial port that your Arduino is plugged into. It is most likely 0, but it may be another number.
Once you know the number, add the code below to your setup() and change the number in the [ ].
// you may need to change the number in [ ] to match
// the correct port for your computer
myPort = new Serial(this, Serial.list()[0], 9600);
We will now use a new function that is called every time there is new data waiting to be read in from the serial port. This function is defined outside of any other function (it doesn’t go inside setup() or loop()).
/* serialEvent
this function is called whenever there is data waiting
on the serial port
*/
void serialEvent(Serial p) {

}
Inside of serialEvent() we read in the data and save it in a String.
String inString = p.readString(); // read in the string
Now print out the data that is read in.
Exercise 6
We can remove any extra whitespace (that’s things like new lines, tabs and spaces) using a built-in function, trim.
inString = trim( inString ); // remove any whitespace
Add this line to serialEvent and see if it changes what is printed. Try adding some whitespace to what Arduino prints to the serial port and see if it has any effect.
Exercise 7
We no longer want a key press to clear the screen, so let’s change the keyPressed() function.
/* clearDrawing
 this function is called when button on Arduino is pressed
 */
void clearDrawing() {
    background( bgColor );
}
Now change the serialEvent() function so that the screen is cleared when the data is “0”.
Note that since the data is a String you will need to do the following to test what the data is:
if ( inString.equals("0") ) {

}
Full Source Code
Arduino
// variables for pins
int buttonPin = 7;

void setup() {
  // turn on internal pull-up resistor
  pinMode( buttonPin, INPUT_PULLUP );

  // start Serial
  Serial.begin( 9600 );
}

void loop() {
  // read in value
  int buttonValue = digitalRead( buttonPin );

  // print out value
  Serial.print( buttonValue );

  // wait a little bit
  delay( 30 );
}
Processing
import processing.serial.*;

color bgColor = color( 0 ); // color of background
color penColor = color( 60, 120, 20 ); // color of our pen

Serial myPort; // our serial port

/* setup
   everything here happens only once when
   the sketch starts
*/
void setup() {
  size( 800, 600 );
  background( bgColor ); // set the background color
  noStroke(); // turn off outline around shapes
  fill( penColor ); // set pen color

  println(Serial.list()); // print list of all ports
  // you may need to change the number in [ ] to match
  // the correct port for your computer
  myPort = new Serial(this, Serial.list()[10], 9600);
}

/* draw
   everything here happens repeatedly
*/
void draw() {
  ellipse( mouseX, mouseY, 30, 30 );
}

/* serialEvent
   this function is called whenever there is data waiting
   on the serial port
*/
void serialEvent(Serial p) {
  String inString = p.readString(); // read in the string
  inString = trim( inString );  // remove any whitespace
  println( inString );
  // if the button is pressed, it sends a "0"
  if ( inString.equals("0") ) {
    clearDrawing();
  }
}


/* clearDrawing
   this function is called when button on Arduino is pressed
*/
void clearDrawing() {
  background( bgColor );
}


