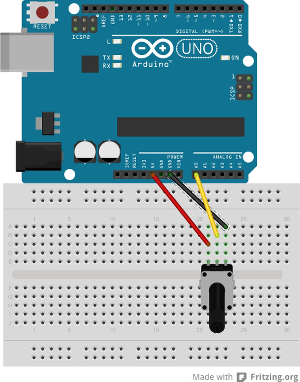
We will now add controling the pen from a potentiometer. For now our button won’t work with Processing, but will fix that at the end.
Circuit
Exercise 1
Build a circuit with the Arduino reading in the value from a potentiometer into Analogue Pin 0.

In order to have both the button and potentiometer on the same breadboard you will need to alter the layout in order for both components to access 5V.
Arduino Code
With the button we were only sending one character at a time – either a 0 or 1. When we read in an analogue value, we can have up to 4 characters at a time (since the analogue inputs can be up to 1023). We need to know how many digits are in number, so we add a special character to separate consecutive values. We could use anything, but it’s easy to use the newline character '/n'.
Exercise 2
Write a Arduino sketch that reads the potentiometer value and prints to the serial port with a newline after each value. Verify it’s working by looking at the data stream in the Serial Monitor.
Processing Code
We have already set up our Processing sketch to read in data from the serial port, but we can have pay special attention to certain characters. We can tell it to only call the serialEvent() function when a certain character is received. This lets the data sit and wait for all the characters to arrive before reading in the String of our full value.
Exercise 3
In your setup() function, add the following line after you instantiate the Serial object:
myPort = new Serial(this, Serial.list()[10], 9600);
myPort.bufferUntil('n');
Print out the value of inString in your serialEvent() function and check that the full number is being read in, not only single digits at a time.
Exercise 4
In order to use the value being read in as a int variable, we need to convert or cast the String into an int. The following line does that.
int v = int(inString); // convert from a string to int
Now that we have an integer that is the value from our potentiometer, change your Processing code so that the potentiometer moves the pen of your drawing left and right (the up and down is still controlled by the mouse).
Full Source Code
Arduino
// variables for pin
int xPin = A0;


void setup() {
  // start Serial
  Serial.begin( 9600 );
}

void loop() {
  // read in value
  int xValue = analogRead( xPin );

  // print out value
  Serial.println( xValue );

  // wait a little bit
  delay( 30 );
}
Processing
import processing.serial.*;

float penX;

color bgColor = color( 0 ); // color of background
color penColor = color( 60, 120, 20 ); // color of our pen

Serial myPort; // our serial port

/* setup
   everything here happens only once when
   the sketch starts
*/
void setup() {
  size( 800, 600 );
  background( bgColor ); // set the background color
  noStroke(); // turn off outline around shapes
  fill( penColor ); // set pen color

  penX = width/2; // starting x position of pen

  println(Serial.list()); // print list of all ports
  // you may need to change the number in [ ] to match
  // the correct port for your computer
  myPort = new Serial(this, Serial.list()[10], 9600);

  myPort.bufferUntil('n');
}

/* draw
   everything here happens repeatedly
*/
void draw() {
  ellipse( penX, mouseY, 30, 30 );
}

/* serialEvent
   this function is called whenever there is data waiting
   on the serial port
*/
void serialEvent(Serial p) {
  String inString = p.readString(); // read in the string
  inString = trim( inString );  // remove any whitespace
  println( inString );

  int v = int(inString); // convert from a string to int
  penX = map( v, 0, 1023, 0, width); // map to window size
}


/* clearDrawing
   this function is called when button on Arduino is pressed
 */
 void clearDrawing() {
   background( bgColor );
 }


